")


With the Holidays around the corner, some of us can already be exhausted before stepping into stores. Some may resort to trusty Amazon prime; others can pop in and out of CVS for a gift card or two and there those who decide to hand-make their gifts. I have contemplated all of these options. With the number of weddings and portrait sessions, Victor and I are privileged to photograph; we wanted to do something different this year. We want to encourage family, friends, clients to print their cherished memories. Particularly those of you who tied the knot or about to 😉
With just about everything being touchscreen and instantaneous, instead of sharing on Instagram or other outlets we encourage to share and gift prints instead (thus the name of our series). Anything can break, and digital files are no exception. You can make a copy of print, but you can’t make a copy of a corrupted file. So instead of plastering your images on your virtual ‘wall,’ have them holiday ready for family and friends to treasure and hold. So some ideas came about…
It may be no secret that I love vintage treasure hunting and antique details. On our first free Saturday this month, Victor and I went thrifting. Something we haven’t done in ages. I was on the search for an old custom frame to update one of our bedroom gallery walls. I decided to repurpose a unique frame for a fraction of the price at a custom framer’s shop. Once I found a perfect one at the Salvation Army, here’s what I did. See pictures below.
Supplies needed:
- Vintage Frame
- Favorite Print
- Scissors
- Ruler
- Screwdriver
- Rag to clean
- Spray-paint of desired color of your choice (second color optional)
- Angled Brush
- Pretty bow
 Find a pretty frame in unexpected places like your nearest Hospice Thrift store, Salvation Army other flea market places. I chose an ornate frame because it will tie into the theme of our new gallery wall perfectly. Bonus if you find a frame with a mat. Mats create a custom look to your picture.
 Print and cut your picture to frame size. This was a picture taken by Kristine from Kristine Herman Photography for our new website/anniversary session. I printed a picture that wasn’t a portrait and more of a detail. I love the contrast between colors here. I also made sure that the color that I chose for the frame went perfectly with my picture otherwise it would compete with it making it look a little to mis-matched.
  Gather supplies. Make sure that you’ve cut or have the right size for your picture by measuring it. Have a rag or cloth to wipe down frame from dirt or dust that it might’ve collected over time.
 Lift up metal fasteners with screw or knife to loosen the back of the frame. Beware of doing this with your bare hands. I learned that the hard way several years ago.
  Ahem! excuse the lack of manicure.
 Peel away the backing, the glass, and mat. Clean inside the glass with a rag.
  I wasn’t a fan of the mat color combo so I decided to make it look like the classic white beveled mat look by spray-painting a flat white all over. Mats are incredibly expensive so whenever you are lucky to have one, use it! Mats also give a custom look to your picture frame making it look as if you spent a little more than you did. Afterwards, prime the frame with spray-paint.
 After priming the frame and allowing it to dry, start painting with the desired color. I used chalk paint since it was left over from another DIY project I was working on. I used a 1.5 inch angled nylon brush courtesy of Tam Paints. I only painted one coat to have a less than perfect look.

Let the paint dry. I’d wait more than a few hours. I moved in a little early and smuged it all over so be careful! Assemble all pieces together. This is where you get to see it come together.
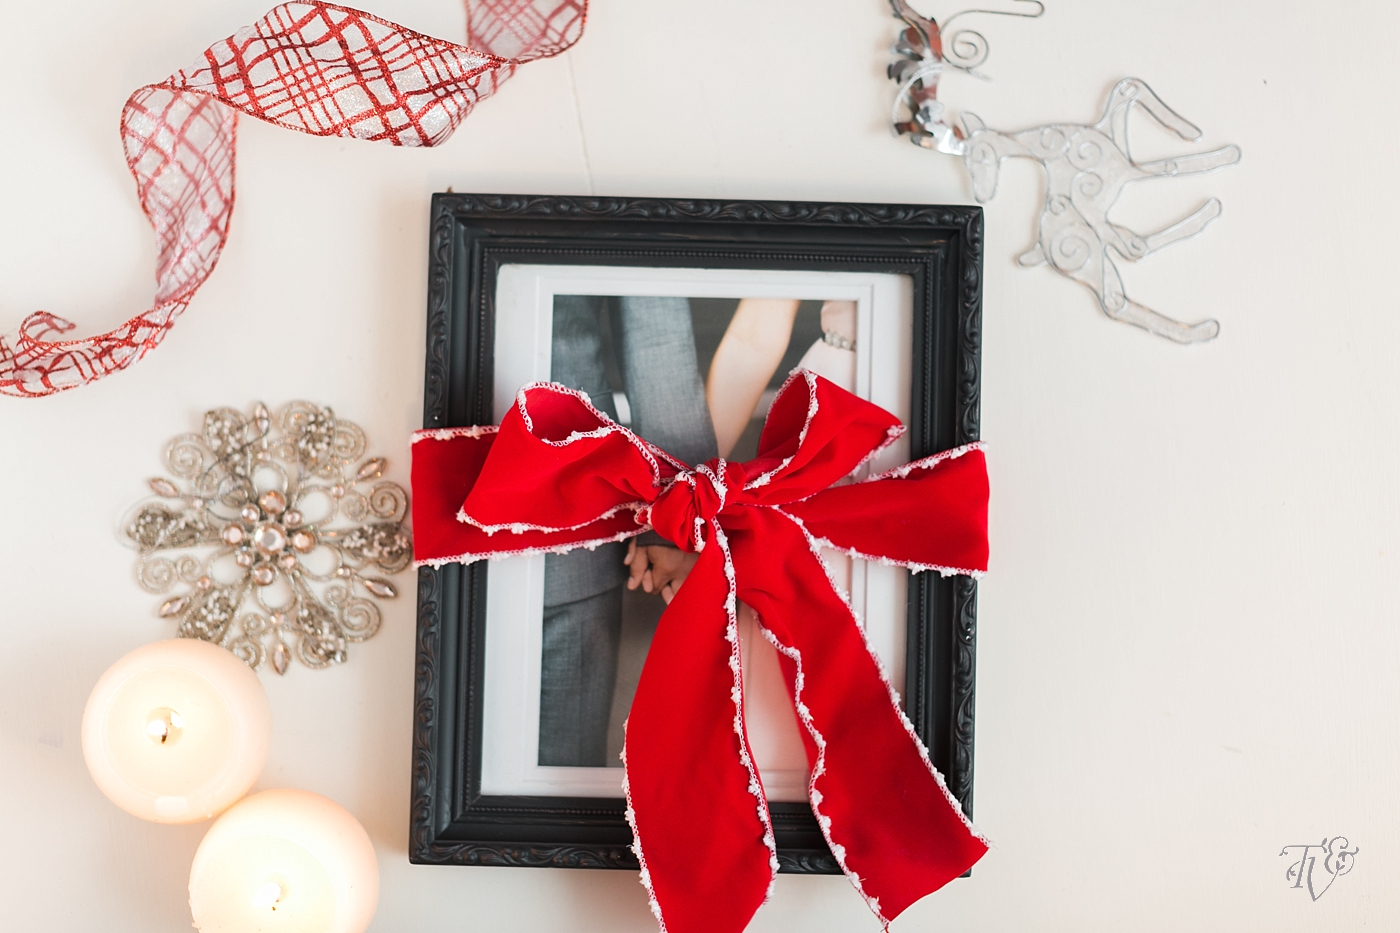
  Fasten it and voila! Behold your beauty! {Disregard the paint mark on the glass. I got a little too excited and wanted to see it all come together before the paint dried completely}
 Tie a pretty bow if gifting it to someone and if not, tie a bow anyway since Christmas is almost here!
 Although this may not be a new idea, I hope it inspires you to think of other ways to present the memories you made this year.
Comments
")
Comments Off on Print Your Prints!| DIY Repurpose Vintage Frame for Holiday Gift Idea