")


Something we love at weddings is taking photos of the guests dressed up to the nine with the newlyweds. It’s such a blissfully wonderful time, and there’s nothing but smiles, laughter and loud congratulatory clamor in the air. At times, Victor and I work with photo booth companies who take pictures of the guests having a casual and fun time at the event, and other times we do our best to capture them on our own. I remember being so busy at my own wedding trying to greet and thank my guests but I couldn’t quite keep track of all of the loved ones who blessed us with their attendance. I like to rely on my wedding photographer photos that were carefully curated to tell the tale of it all. I don’t have enough wall real estate to print all one thousand images so I thought we can be creative about it.
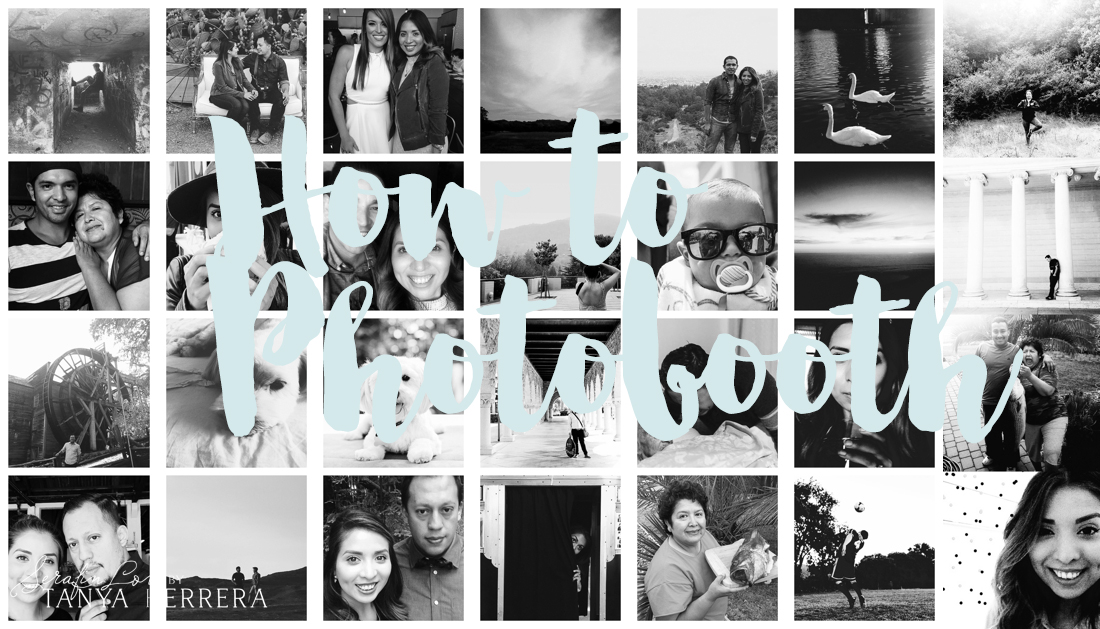
This Print Your Prints! project was inspired by the Beautiful Mess application, PartyParty. Whether, you were able to budget in a photo booth or not, and even if you haven’t planned a wedding, this is a funky way of displaying all those images that are precious without taking too much space (both on the cloud and your home’s wall ;). Because, I haven’t quite narrowed down with Victor all of the pictures I’d love to print from our day, I opted to select photos from this year. I selected them from our travels, meeting our new family members, on the job, when my little brother visited us, or that one time my mom got a 3-foot fish. I loved this project because it forced me to take some of my favorite photos off from my phone and onto paper.
Supplies:
- PartyParty Application
- 11×17 photo paper (Optional if printing from Kinko’s)
- Printer (Optional if printing from Kinko’s)
- Fun 16×20 frame (A floating glass frame is best)
- Ruler
- Scissors or Paper Cutter
- Tape
- Colored paper (optional)
- Mobile Phone (preferably iPhone)
 Download the application PartyParty from the Apple store. Select 32 of your favorite images and import them to your phone (You can email them to yourself, dropbox or airdrop them to your phone). I find it best to create an ‘album’ with all of the selected images for easy access. I named the album ‘DIY photobooth.’
 I like the black and white look, it seems more classic and aesthetically makes sense with the room it’s going to be hung. This step can be skipped or go the extra bit and turn them black and white from your phone and/or from the app.
 Import 4 images into the app to create the photo booth strip. I went with a 4-picture layout, even though the app allows for more pictures up to infinity! I found four images per strip seemed to be more fitting with a 16×20 frame. You can get creative and do more pictures per strip. Once you’ve selected the four images you will be placing on a strip, go to the vertical grid layout and then tap the next arrow. You will see options to add filters and play with the images even further. I added a square white frame to all the strips to create separation between the images. Afterwards, tap the export button to save to your camera roll.

I printed the strips directly from my computer (I emailed all the photo booth strips to myself). You can also take your photo booth strips and print it from Kinkos or at your local printer. Just make sure to print it on 11×17 size paper. The strip size is 640 px by 2560 px (9 inches x 35 inches). I then cut the trips with a paper cutter or scissors. Whatever is easiest. If not using a floating glass frame, try adding an interesting textured paper to place on top. You will see in the far right top corner photo how I laid it out on the paper.  I then laid out the strips how I want them to be displayed. I didn’t care much for the chronological timeline of the images, I just wanted them to be proportional to the glass (and mat if you’re not doing a floating glass frame). I then tape them to the glass so they won’t move and/or tilt once up on the wall. If not using a floating glass frame, tape them to an interesting graphic paper or opt for a blank piece of paper. Just make sure that the paper fits in the frame and whether it’s best to use a mat. I used a ruler to make sure all sides were even. After they were all taped then I placed the backing of the frame and voila! all the strips were beautifully displayed.
The next part is to find a great place to show off your piece. I hate putting up frames by myself so Victor will have to be stuck with a little labor. Questions? Will you tackle on a little DIY photobooth print? Let me know in the comments below 😉
Comments
")
Comments Off on How to DIY Photo Booth Pictures | Print your Prints!